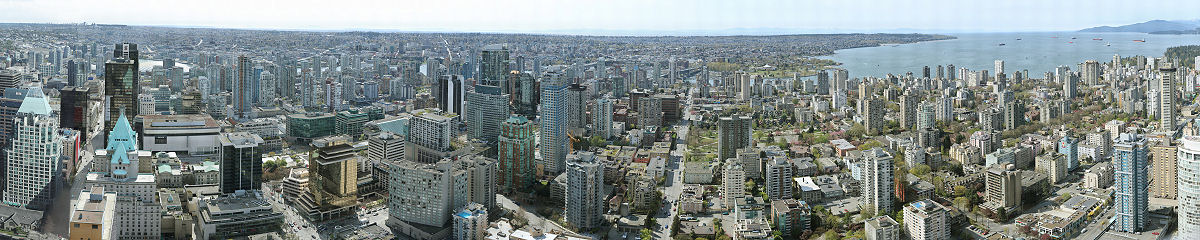
Vancouver 12-Gigapixels is a 240° East-to-Northwest view of Vancouver, BC Canada taken from the Living Shangri-la Vancouver skyscraper, the tallest building in the city.
The image is a composite of 1608 individual photos taken on April 10 and May 8, 2010 between the hours 11:30am – 3:30pm using a GigaPan EPIC 100, Canon EOS Rebel T2i and a Canon EF 70-300mm f/4-5.6 IS USM.
In print form, the image is 96.4 m x 16.0 m (316 ft x 53 ft). Roughly, it is 5 stories high with a width 88% that of a NFL football field.
- Dimensions: 273,298 × 45,474 pixels
- Pixels: 12,427,953,252
- No. of images: 1,608 @ 18 MP/image
- Size: 34GB (Photoshop PSB format)
- Shooting: 210 mins
- Stitching: 3 weeks
- Rendering: 3 hrs 45 mins *
- Public Availability: June 4 2010
* On an 8-Core Apple Mac Pro (2 x 2.8Ghz Quad-Core Intel Xeon Processor), 18GB RAM, 2TB HD, Mac OS X Snow Leopard 10.6.3
 My initial goal was to create a complete 360° GigaPan view of Vancouver but it was physically impossible to do so. A total of 3 groups of images were shot from 3 different locations on April 10 and May 8, 2010 between the hours 11:30am – 3:30pm from the 58th floor of Living Shangri-la Vancouver, the tallest building in the city at 201m (659 ft).
The images were captured using the GigaPan EPIC 100, a Canon EOS Rebel T2i and a Canon EF 70-300mm f/4-5.6 IS USM. Each photo was 18 megapixels in 25MB RAW+JPEG format. During the shoot, instead of an SDHC card, the photos were saved directly to an IBM ThinkPad 1.4 Ghz Intel Laptop with 2GB RAM, 80GB HD running Windows XP Pro.
All photos from the building with the Canadian flag (left side) to the right side were shot on April 10, 2010 starting at 11:30am PDT – and against the sun. By 1:00pm PDT, the GigaPan imager was shooting towards the west (the right side of the image) and the sun’s movement obviously changed the lighting of the view. Photos from Port Metro Vancouver (on the extreme left) to the Canadian flag were shot on May 8, 2010 between 2:00pm – 3:30pm PDT. The first location was on a balcony with a South to Northwest view. And the 2nd location was by the dining room 16 meters (50ft) away from the balcony and through a glass window with an East to South view.
Stitching and rendering was done on an 8-Core Apple Mac Pro (2 x 2.8Ghz Quad-Core Intel Xeon Processor) with 18GB RAM, 2TB HD, Mac OS X Snow Leopard 10.6.3.
Because each group of image had a different setup, differences such as light levels, parallax, shadows and weather conditions were obviously present. It was possible to merge only 2 of the 3 groups. The 3rd group had to stand on its own.
AutoPano Giga, with its Smartblend feature, seemed to be a good choice for stitching the 2 image groups. But the process turned into a nightmare. APG v2.06, v2.07, and v2.08 would either freeze or randomly crash. It was also very slow. Bottom line: AutoPano Giga had too many issues and was totally unreliable. After a waste of a week and a half of my time, I gave up on APG. If the Kolor engineers themselves did not use Smartblend and required the help of Intel when creating Paris 26-Gigapixels, why would they include it and expect other people to use it on standard computers?
Instead, applying Occam’s Razor, I went back to the basics: I simply used GigaPan Stitch and Adobe Photoshop CS5. GigaPan Stitch may not have Smartblend (or maybe it does) but its definitely stable and reliable – even renders much faster than APG! Rendering took only 3hrs 45 mins. Alignment of images was more precise.
Clean up was done with Adobe Photoshop CS5. To open or save a 75GB PSB file with layers took over an hour each time. I was pushing the limit of Photoshop CS5 and the Mac Pro. The cleanup process had to be carefully planned out and structured to minimize mistakes and to save time. I had an AMD Phenom 9550 Quad-Core 2.6Ghz Desktop, 4GB RAM, 2TB HD running Windows XP Pro that allowed me to do advanced tests on a scale-sized image while Photoshop was processing the larger image on the Mac. The whole process – which took about 10 days – may have been very slow and tedious especially in dealing with large files but it was definitely dependable.
The final flattened image was 34GB in PSB format. This was sliced and diced and 26,200 smaller tiles were created. Uploading a .RAW file to GigaPan.org took 16 hours and uploading the tiled images to Gigapixel.com took 6 hours.
The entire image was created solely by Ronnie Miranda as a personal project. He was neither sponsored nor commissioned by any company or individual.
Special Thanks to:
Shangri-la Hotel Vancouver
Ed Brea, General Manager
Jeff Froehlich, Director of Sales & Marketing
Eleanor Mah, Senior Sales Manager
Ryan Fowler, Security
Sureena Parmar, Concierge
Ms. Maggie Wang